
TIPS AND TRICKS
Shortcuts & tips to make your experience easier
- Hold the looming tool from middle to be able to effectively pick up the yarn from the bottom of the peg.
- Wrap the yarn tightly around the entire peg to avoid the yarn from coming undone when weaving the each peg individually.
- Use thin yarn because it is easier to wrap around and identify when weaving each peg, closing the hat, and making a brim.
- Make sure you have sufficient yarn depending on the size, about half of a regular yarn ball is used in one regular sized hat.
ATTENTION: DO NO CUT THE YARN WHILE WEAVING OR WRAPPING, YOU WITH CUT IT AT THE END AS SPECIFIED IN STEP 5 BELOW.


MAKING A YARN HAT WITH A LOOM

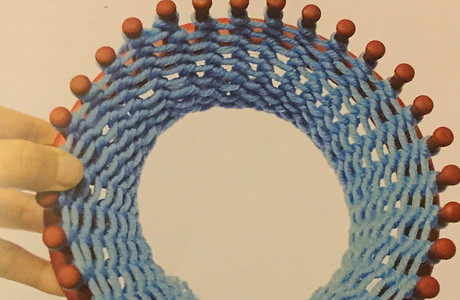
STEP 1: PREPARING THE LOOM
To start:
Wrap the yarn of choice around the peg to keep the yarn in place. Hold the loom facing towards you pulling the yarn towards the inside of the ring. Wrapping each peg in a loose manner move along the loom in a counterclockwise manner until reaching the end. Once at the end hold the yarn's end in one hand while the other pushes the wrapped yarn to the bottom of the peg.

STEP 2: WRAPPING/SECURING KNITTING
Continue to wrap the yarn around each peg in a counterclockwise manner so that there is now 2 rows on the loom. Then wrap the end of the yarn on the end to make sure that the yarn is secure and tightly hold in place.

STEP 3: KNITTING/LOOMING 1ST ROW TO 2ND ROW
Beginning with the peg at the right of the peg on the edge use the accompanying loom hook to lift the bottom row of yarn over the top of the peg. Then once you have gone all around in a counterclockwise manner release the yarn on the peg of the edge and repeat steps 1 and 2 ( wrapping/knitting).
STEP 4: ADDING A BRIM
After Repeating steps 2 and 3 and having knitted approximately 4 or 5 inches reach inside the loom, placing the loop from the bottom row over the corresponding peg. This action creates a fold or brim out on the knitted yarn. After following the steps above and working all the way around the loom, knit the row by picking the bottom row over each peg so that the brim is complete and secure. Continue to wrap and knit as done so in steps 2 and 3 until you have reached the desired overall length and size of the hat.

STEP 5: REPEATING WRAPPING AND KNITTING SKILLS/ FINISHING OFF THE HAT
Caution: In order to continue with this step assure that you have the desired hat length and have finished knitting.
Now that the knitting is done and the hat is ready to be finished from the top take approximately 18 inches of yarn or the size of the loom wrapped around once and cut it with a pair of scissors. Take the enclosed craft needle and begin to thread by beginning with the first peg. Run the needle through the yarn on peg and lift off each one continuing to lift off and thread each peg after in a counter-clockwise manner.

STEP 6: CLOSING THE HAT
You're oficially about to finish your hat!!!
After finishing step 5 by threading and lifting off the yarn from each peg pull the remaining thread tightly and tie off with a square knot by running the needle into and back out of the hat 4 times ( or a square ). Then go back into the hat and make one last tight knot in the middle making sure it is secure before cutting the remainder of the yarn.
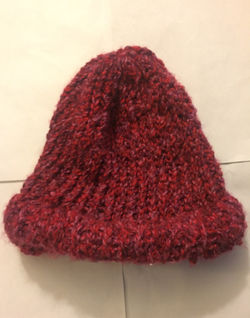
And Bara Bing Bara Boom... There's your personally made yarn hat!
MY EXPERIENCE
 |  |  |
|---|